

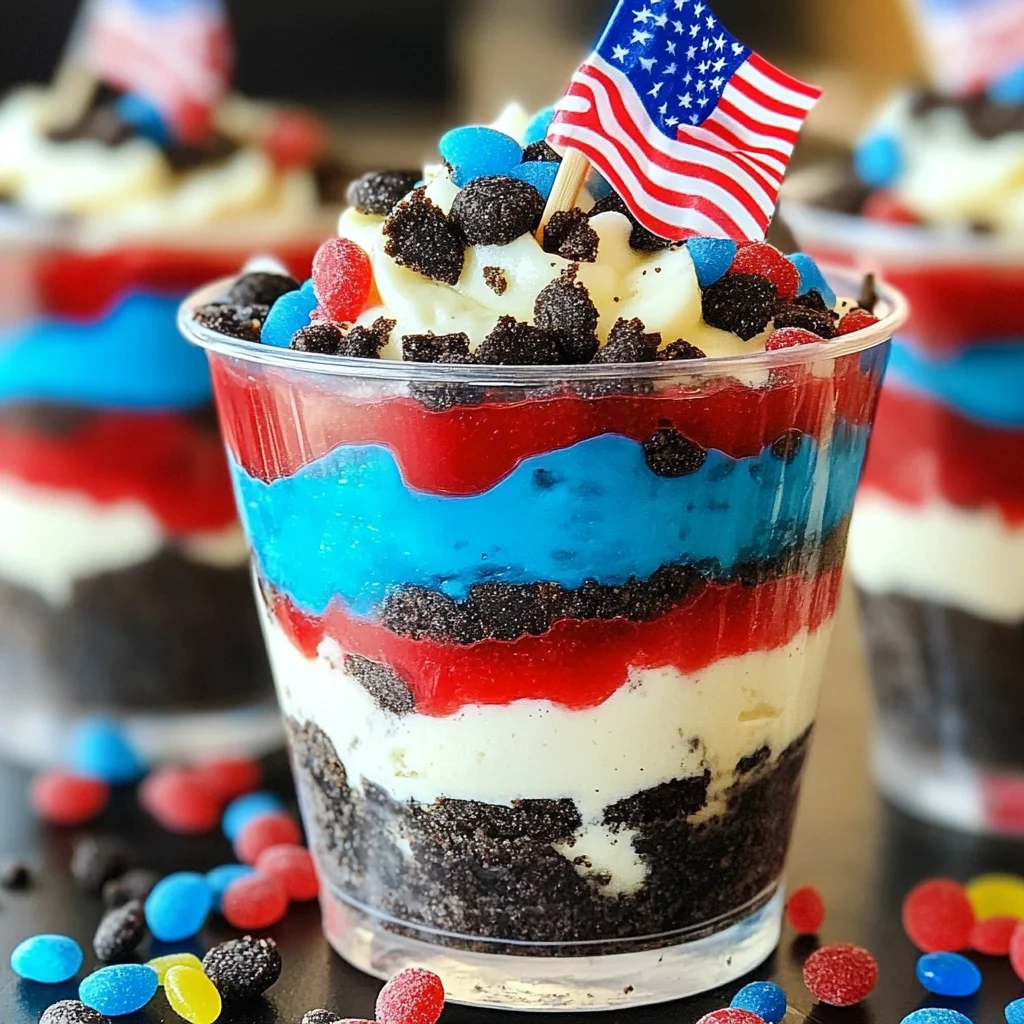
Red White and Blue Dessert Dirt Cups are the perfect treat for any patriotic celebration. With their vibrant layers of cheesecake pudding and OREO cookies, these delightful cups not only look festive but taste incredible too. They are an easy-to-make dessert that everyone can enjoy, making them ideal for parties, barbecues, and family gatherings. The combination of creamy pudding and crunchy cookies creates a unique texture that will impress your guests.
Why You’ll Love This Recipe
- Easy to Prepare: This recipe requires minimal cooking skills and only takes about 10 minutes to prep.
- Fun for All Ages: Kids and adults alike will love assembling their own dessert cups.
- Visually Stunning: The striking red, white, and blue layers are sure to catch the eye at any gathering.
- Customizable: Feel free to adapt the colors or toppings based on your event theme.
- Perfect for Any Occasion: Ideal for the 4th of July, Memorial Day, or any patriotic celebration.
Tools and Preparation
To create these delightful Red White and Blue Dessert Dirt Cups, you’ll need some essential tools that make the process smoother. Having the right equipment ensures your dessert turns out beautifully layered and delicious.
Essential Tools and Equipment
- Mixing bowl
- Whisk
- Plastic dessert cups
- Measuring spoons
Importance of Each Tool
- Mixing bowl: A large mixing bowl is necessary for combining all pudding ingredients efficiently.
- Whisk: A whisk helps achieve a smooth and creamy texture in your pudding mixtures.
- Plastic dessert cups: These cups provide a fun way to serve individual portions while showcasing the vibrant layers.
Ingredients
To make these Red White and Blue Dessert Dirt Cups, you will need the following ingredients:
For the Pudding Layers
- 2 Boxes Cheesecake Pudding (3.4 ounces)
- 4 Cups Milk
For the Crunchy Layer
- 19 OREO Cookies, crushed
For Coloring
- ¼ Teaspoon Red Gel Food Dye
- ¼ Teaspoon Blue Gel Food Dye
Toppings
- 8 Red and Blue pectin-based gummy candies
- SUPPLIES:
- 4 Flag Toppers
- 4 Plastic Dessert Cups
How to Make Red White and Blue Dessert Dirt Cups
Step 1: Prepare the Pudding Mixture
- Empty both boxes of pudding into a large mixing bowl.
- Add the milk to the bowl.
- Whisk until the mixture thickens.
Step 2: Color Your Pudding
- Divide the pudding into two bowls: put 1 cup in one bowl and 1 ½ cups in another bowl. Reserve any remaining pudding.
- Add blue dye to the bowl with 1 cup of pudding and stir until uniform in color.
- Add red dye to the bowl with 1 ½ cups of pudding and mix thoroughly until there are no streaks.
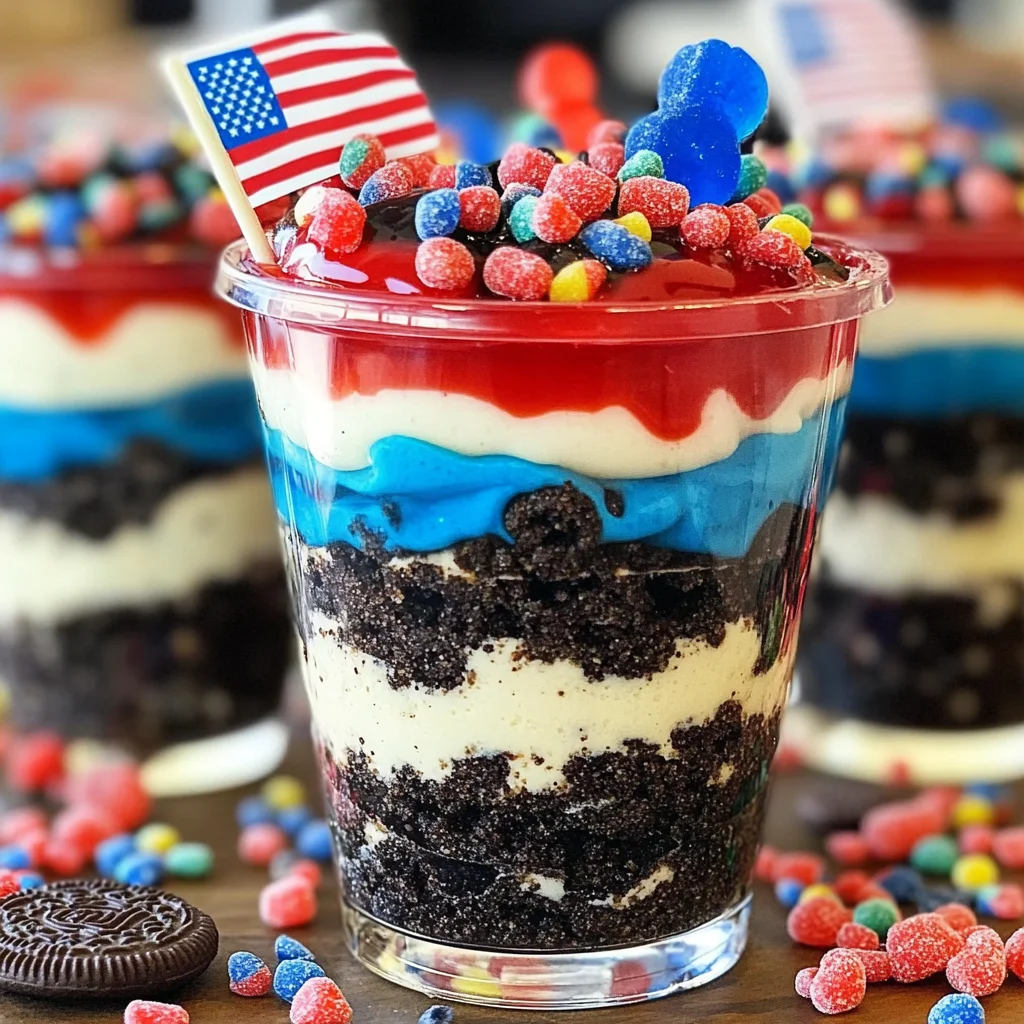
Step 3: Assemble Your Dessert Cups
- Place 1 tablespoon of crushed OREO Cookies at the bottom of each dessert cup evenly.
- On top of the OREO layer, add 2 tablespoons of blue pudding.
- Follow with another tablespoon of crushed OREO spread evenly over the blue layer.
- Next, add 3 tablespoons of white pudding as a layer on top.
- Sprinkle in 1 ½ tablespoons of crushed OREO again as another crunchy layer.
- Pour in 4 tablespoons of red pudding as your next colorful layer.
- Finish by adding a final layer with 2 tablespoons of crushed OREO on top.
Step 4: Final Touches
- Top each dirt cup with two pectin-based gummy candies for decoration.
- Add flag toppers into each cup for that festive flair.
Enjoy your delicious Red White and Blue Dessert Dirt Cups! They’re sure to be a hit at your next gathering!
How to Serve Red White and Blue Dessert Dirt Cups
Red White and Blue Dessert Dirt Cups are not only delicious but also visually appealing. They make for a perfect treat at any patriotic gathering. Here are some fun serving suggestions to elevate your dessert experience.
Individual Cups
- Each guest gets their own cup filled with layers of creamy goodness, making it easy to serve and enjoy without sharing.
Festive Plates
- Place the dessert cups on themed plates to enhance the festive atmosphere. Look for red, white, and blue designs to match the dessert.
Garnished with Fresh Berries
- Top each cup with fresh strawberries or blueberries for an extra burst of flavor and a pop of color that complements the layers.
Ice Cream Scoop
- Serve alongside a scoop of vanilla ice cream for a delightful combination of creamy textures that kids and adults will love.
How to Perfect Red White and Blue Dessert Dirt Cups
To ensure your Red White and Blue Dessert Dirt Cups turn out perfectly, follow these simple tips.
- Use fresh ingredients: Fresh dairy products will enhance the flavor and texture of your pudding.
- Layer carefully: Take your time when adding layers; this will create a beautiful presentation that’s as appealing as it is tasty.
- Chill before serving: Refrigerate the cups for at least an hour before serving. This helps the flavors meld together beautifully.
- Experiment with colors: Feel free to adjust food dye amounts or use other colors for different occasions while keeping the patriotic theme intact.
Best Side Dishes for Red White and Blue Dessert Dirt Cups
Pairing side dishes with your Red White and Blue Dessert Dirt Cups can create a well-rounded menu. Here are some great ideas:
- Grilled Chicken Skewers: Juicy chicken skewers seasoned with herbs offer a savory complement to sweet dessert cups.
- Vegetable Platter: A colorful array of veggies such as carrots, celery, and bell peppers served with hummus provides a refreshing crunch.
- Fruit Salad: A mix of seasonal fruits adds a light touch that balances out the richness of the dessert.
- Corn on the Cob: Grilled corn brushed with butter brings a sweet, smoky flavor that pairs well with any meal.
- Pasta Salad: A cold pasta salad mixed with fresh veggies offers a hearty side dish that’s easy to prepare ahead of time.
- Caprese Skewers: Cherry tomatoes, basil, and mozzarella drizzled with balsamic glaze make for an elegant snack option.
- Potato Chips: For something crunchy, serve classic potato chips or tortilla chips with salsa or guacamole.
- Cheese Platter: An assortment of cheeses can provide savory bites that contrast nicely with the sweetness of the dirt cups.
Common Mistakes to Avoid
Creating Red White and Blue Dessert Dirt Cups can be easy, but there are a few common pitfalls to watch out for.
- Boldly skip the mixing: Not whisking the pudding thoroughly can leave lumps. Ensure you mix until smooth and thickened.
- Boldly ignore layering: Skipping layers can lead to a mixed-up dessert. Follow the layering instructions carefully for the best presentation.
- Boldly forget the color: Neglecting to mix in the food dye properly might result in streaks. Stir until the colors are completely blended.
- Boldly overlook measurements: Using incorrect ingredient amounts can alter taste and texture. Always measure accurately for best results.
Storage & Reheating Instructions
Refrigerator Storage
- Store in airtight containers for up to 3 days.
- Keep layers intact for best texture.
Freezing Red White and Blue Dessert Dirt Cups
- Freezing is not recommended as it may affect texture.
- If necessary, freeze individual cups for up to 1 month.
Reheating Red White and Blue Dessert Dirt Cups
- Oven: Not applicable for this dessert.
- Microwave: Use low power and heat only if necessary; check frequently.
- Stovetop: Not applicable for this dessert.
Frequently Asked Questions
Here are some common questions about making Red White and Blue Dessert Dirt Cups.
How do I make Red White and Blue Dessert Dirt Cups ahead of time?
You can prepare these cups a day in advance. Just layer them as directed, cover securely, and refrigerate until serving.
Can I customize Red White and Blue Dessert Dirt Cups?
Absolutely! You can add different candies or fruits between layers or use flavored pudding mixes for variety.
What if I can’t find pectin-based gummy candies?
You can substitute with similar candies that fit your needs, ensuring they are suitable for your recipe context.
How long do Red White and Blue Dessert Dirt Cups last?
When stored properly in the refrigerator, these cups will stay fresh for up to 3 days.
Final Thoughts
These Red White and Blue Dessert Dirt Cups are not just visually appealing but also delicious! Their layers of creamy pudding, crushed OREO cookies, and vibrant colors make them a perfect treat for any festive occasion. Feel free to customize with your favorite toppings or colors to suit your celebration needs!
Red White and Blue Dessert Dirt Cups
Red White and Blue Dessert Dirt Cups are a festive treat perfect for any celebration. These delightful layered cups combine rich cheesecake pudding with crunchy OREO cookies, creating a delicious contrast in textures. Vibrantly colored in red, white, and blue, they make an eye-catching centerpiece for summer gatherings like the 4th of July or Memorial Day. Easy to prepare, these dessert cups can be assembled in just 10 minutes. Plus, they’re customizable—swap colors or toppings to fit your event theme! Whether serving at a family barbecue or a patriotic party, these dessert cups are sure to impress both kids and adults alike.
- Prep Time: 10 minutes
- Cook Time: None
- Total Time: 0 hours
- Yield: Serves approximately 6 dessert cups 1x
- Category: Dessert
- Method: No cooking involved
- Cuisine: American
Ingredients
- 2 boxes cheesecake pudding (3.4 ounces each)
- 4 cups milk
- 19 crushed OREO cookies
- ¼ teaspoon red gel food dye
- ¼ teaspoon blue gel food dye
- 8 pectin-based gummy candies for decoration
- 4 flag toppers
- 4 plastic dessert cups
Instructions
- In a large mixing bowl, combine the cheesecake pudding mix with 4 cups of milk. Whisk until thickened.
- Divide the pudding into two bowls; color one portion blue with dye and the other red.
- In plastic dessert cups, layer as follows: 1 tablespoon crushed OREO, 2 tablespoons blue pudding, 1 tablespoon crushed OREO, 3 tablespoons white pudding, 1½ tablespoons crushed OREO, 4 tablespoons red pudding, 2 tablespoons crushed OREO on top.
- Decorate with pectin-based gummy candies and flag toppers.
Nutrition
- Serving Size: 1 dessert cup (150g)
- Calories: 290
- Sugar: 25g
- Sodium: 290mg
- Fat: 14g
- Saturated Fat: 7g
- Unsaturated Fat: 6g
- Trans Fat: 0g
- Carbohydrates: 38g
- Fiber: 1g
- Protein: 4g
- Cholesterol: 25mg